2026 is only a few days old, and we have already started receiving requests for 2027 agendios. Some Agendio planner fans clearly want to get started on making their 2027 planners.
So we’re pleased to let you know that they are now available. You can now purchase both Pro and Classic 2027 agendios starting in January 2027
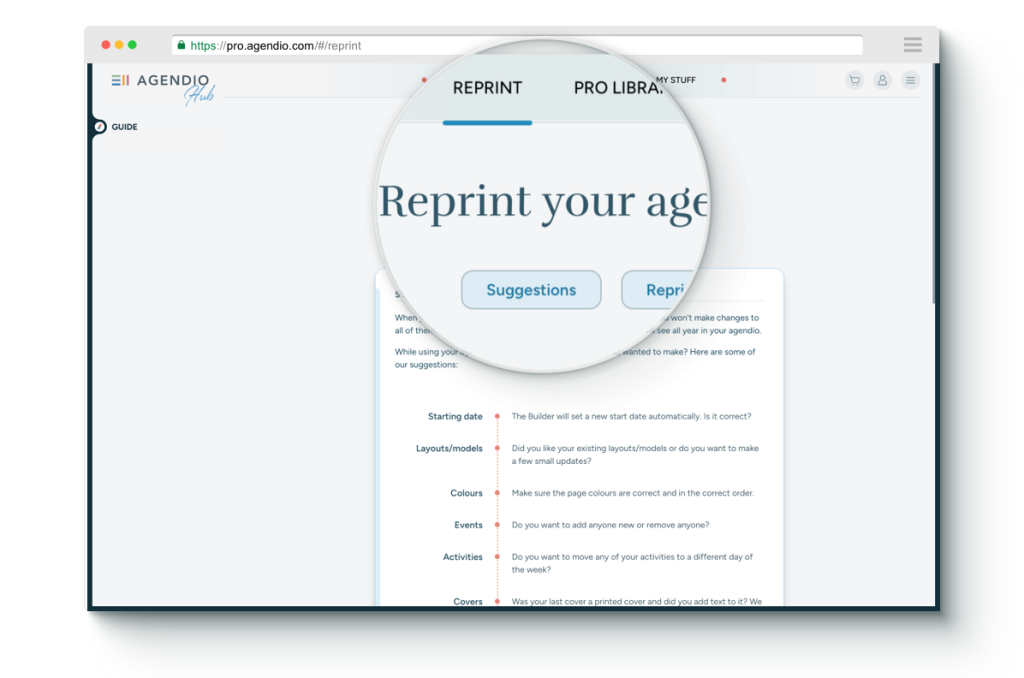
Are you planning to update and reprint your agendio?
During 2025 we added a Reprint section to the Hub. If you’re thinking of reprinting, this is a great place to start. It describes what to do and also includes a section on how to make better reprints.
You can reprint any previously-purchased agendio planner, insert or notebook.
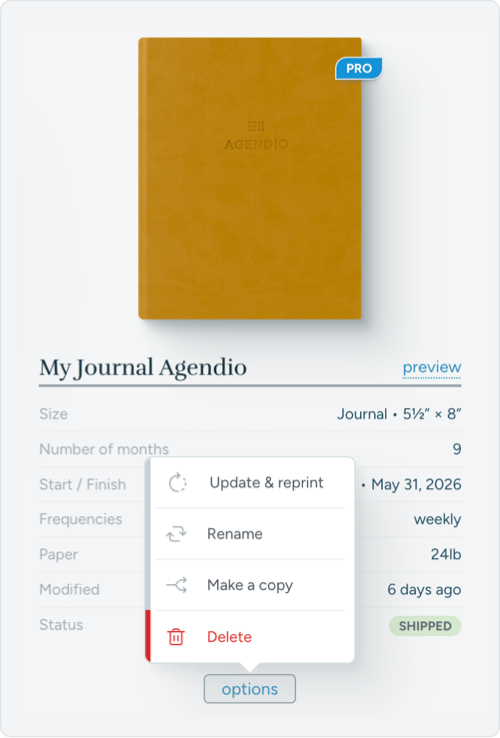
Go to My stuff, find your agendio and select Update & Reprint from the list of options. Your agendio will be copied to the Builder for you to update.
Thanksgiving is a time for reflection and for gratitude. So this week we’d like to share some pages that Agendio planner owners have customized to include gratitude every day of the year.
Only agendio gives you the freedom and control to create pages that truly suit your needs and your lifestyle, and we’re impressed that so many of you use a part of that precious space to give thanks.
Many planners include entire pages devoted to gratitude,
others show gratitude in pagelets on daily and weekly pages,
We know it’s not 2026 yet, but January is 43 days from today, and many of you with January start dates have not purchased your next agendio.
43 days may seem seem like a lot of time, but it often takes a few weeks to get an agendio just right before ordering. Then there’s a little time for us to custom manufacture it, and then the time to get it delivered, and before you know it it’s mid-December!
Or you could order it now and receive it comfortably in December with time to spare and with much less stress.
And there’s another reason to start now: Agendio Pro. The reaction has been amazing and the new features are very engaging. But if you’re starting your first agendio Pro planner, remember that it may take you a little longer the first time to make your very own customized Pro pages.
We’ve updated all our colours in both Pro and Classic and we’ve added many new ones!
It’s been more than ten years since agendio.com started selling planners so we decided this year to go in a new design direction and to freshen up our colours. We now offer 40 updated/new solid colours and 40 updated/new shaded colours. With so many more colours, we now offer a much greater variety.
As part of this new direction, we’ve also added new day pagelets with reversed colours, so you can show off the colours on your weekly and daily pages, just like the coloured Extra page headers we added this past summer. We’ve also removed some shaded date pagelets, to keep the number of options manageable and not overwhelming.
To see all the new colours, simply go to My Stuff and edit an existing page or start a new one.
We have more big news for you if you use a Pro monthly-weekly or monthly-daily agendio or if you plan to create one: We have added a fourth placement option for transition pages, which we call “Separate”, which allows you to completely separate each month’s pages.
Please note that using this feature is entirely optional. It’s a cool feature if you really get into planner details, but you can skip over this completely in the Builder if you want to.
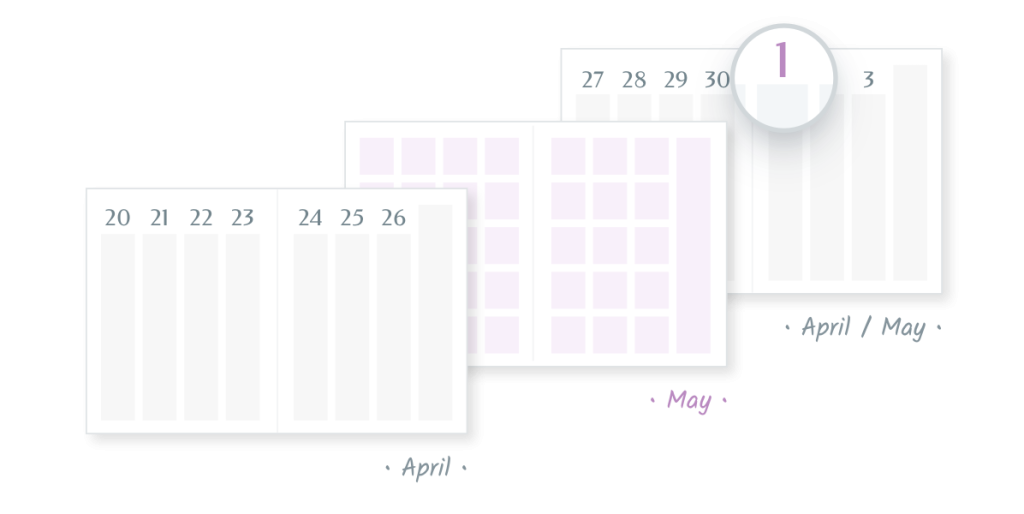
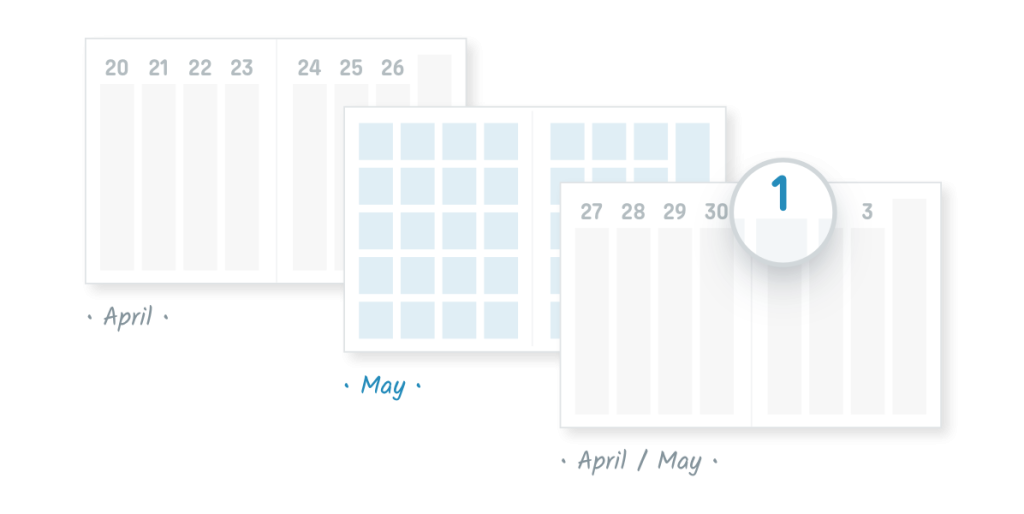
When your planner includes monthly pages and weeklies or dailies, and your monthly pages are mixed with your weekly pages, where do you place the transition weeks – the ones that include days from two different months?
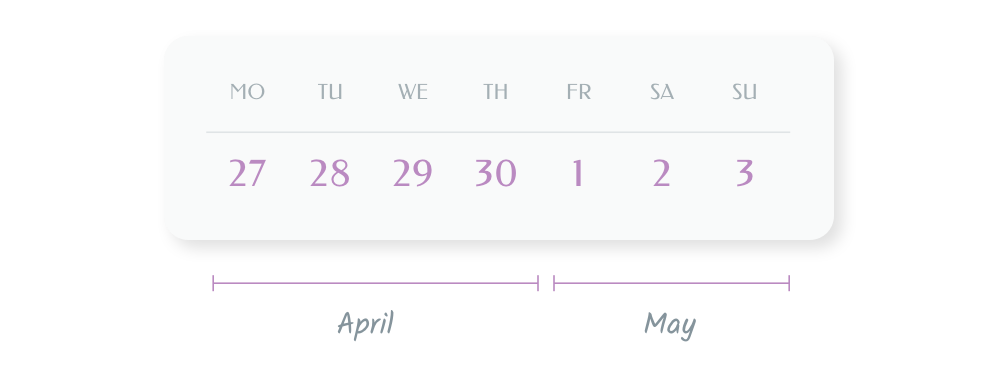
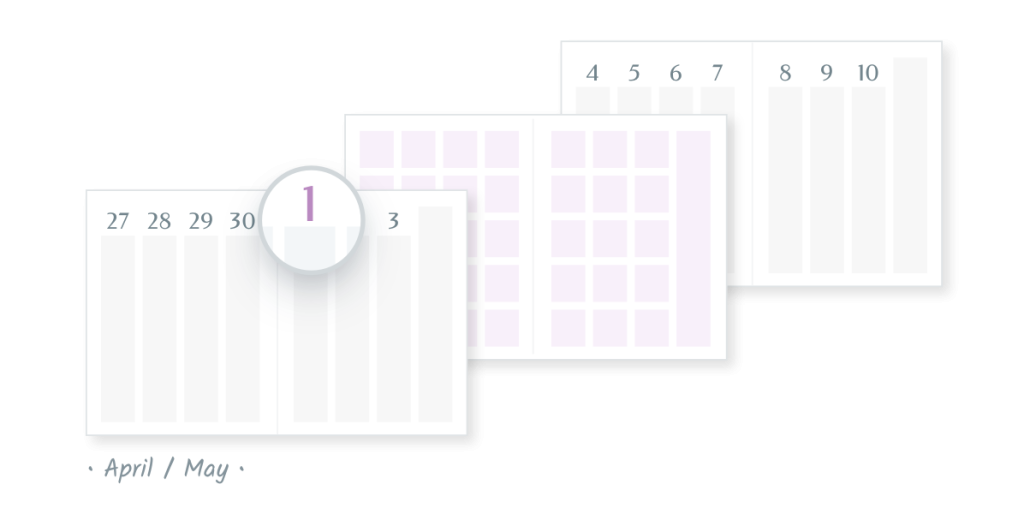
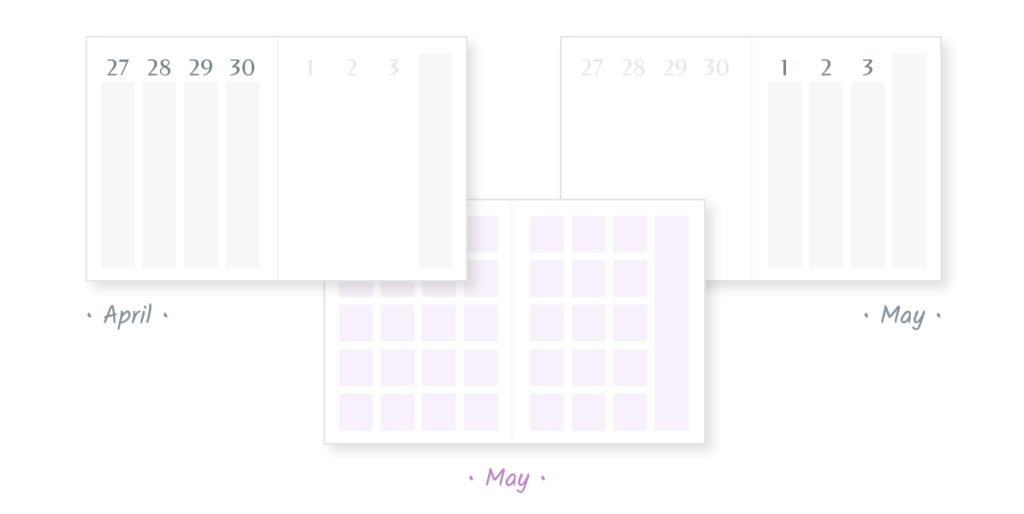
Let’s use an example from 2026, using the week that runs from Monday April 27 to Sunday May 3
Our current default placement is WITH FOLLOWING MONTH: we place the transition weeks with the days from the following month.
We also offer WITH PRECEDING MONTH. If you select it, we place the transition weeks with the days of the preceding month.
And we offer BEST FIT: It automatically selects for you “With preceding month” or “With following month”, depending on which one works better.
And now we have added SEPARATE. The “Separate” method keeps each month separate. So each transition week is printed twice, the first time with the preceding month and the second with the following month.
You can find out more details in the Agendio Guide, but the best way to understand all of these options is to try them out in the Pro Builder, by building a planner with a monthly and another type of dated pages, and then looking at the preview.
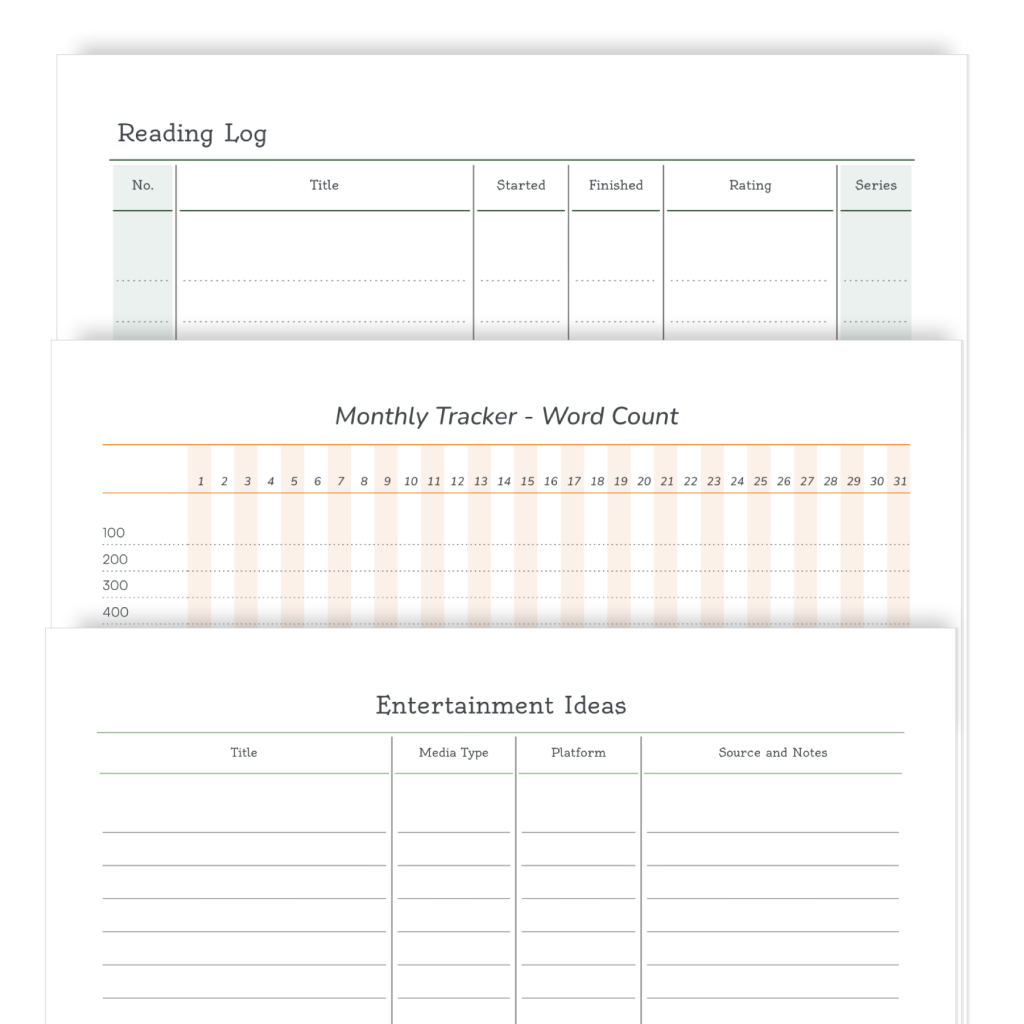
Have you looked at the Pro sharing library lately? More pages are being shared every week, so we thought we’d show you some of them.
Today we’re looking at hobby pages, specifically lists for book lovers and TV/Movie enthusiasts.
If you want to add one of these pages to your Pro agendio, simply select Sharing library when making your pages and then look in the Hobbies category. And at the same time, check out other categories to see if you like some of the other shared pages.
If you haven’t made a Pro agendio planner yet, this may be a good time to give it a try.
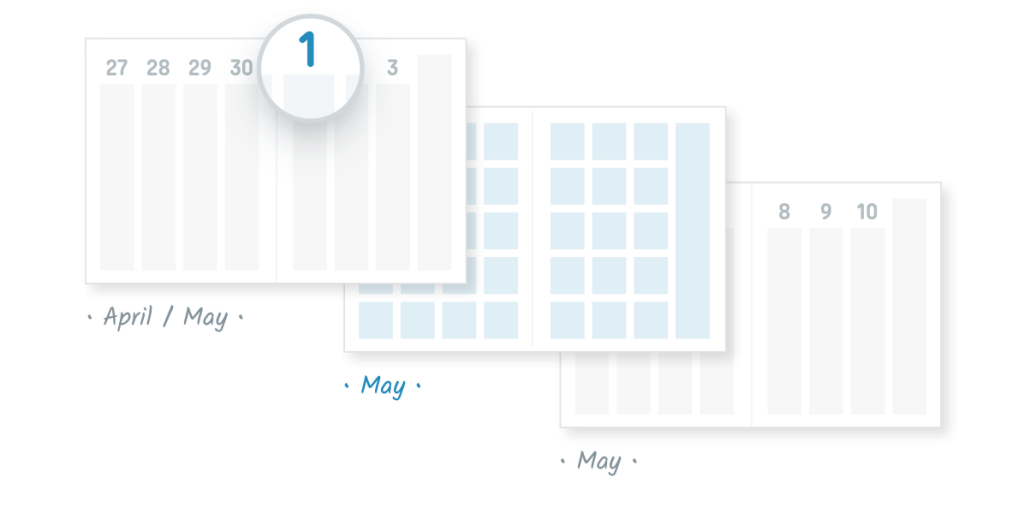
We have big news for you if you use a Pro monthly-weekly or monthly-daily agendio or if you plan to create one!
When your planner includes both monthly pages and another frequency, and your monthly pages are mixed with your other dated pages, there are many approaches for placing the layout that includes pages from both months. We call these “Transition weeks” and until recently, we always placed that layout with the days from the following month.
Let’s use an example from 2026, using the week that runs from Monday April 27 to Sunday May 3.
Currently, we place the transition weeks with the days from the following month, so we would place the spread of April 27 to May 3 with pages from May. We call this placement WITH FOLLOWING MONTH.
This is the default placement for agendios. If you do not select a different placement, this is the one we will use for your agendio.
The big news is that we have added two other options for you to place your monthly pages.
The first one is called WITH PRECEDING MONTH. As you can figure out, if you select it, we place the transition weeks with the days of the preceding month. So in our example, we would place the weekly spread of April 27 to May 3 with pages from April.
The other new option is called BEST FIT: It’s a great feature because it automatically selects for you “With preceding month” or “With following month”, depending on which one is better. If the transition week layout includes more days from the earlier month, it places those days with the days of the preceding month. But if the transition week layout includes more days from the later month, it places the layout with the days from the following month. You can find out more details in the guide, but the best way to understand “Best fit” is to try it out in the Pro Builder, by building a planner with a monthly and another type of dated pages, selecting “Best fit” and then looking at the preview.
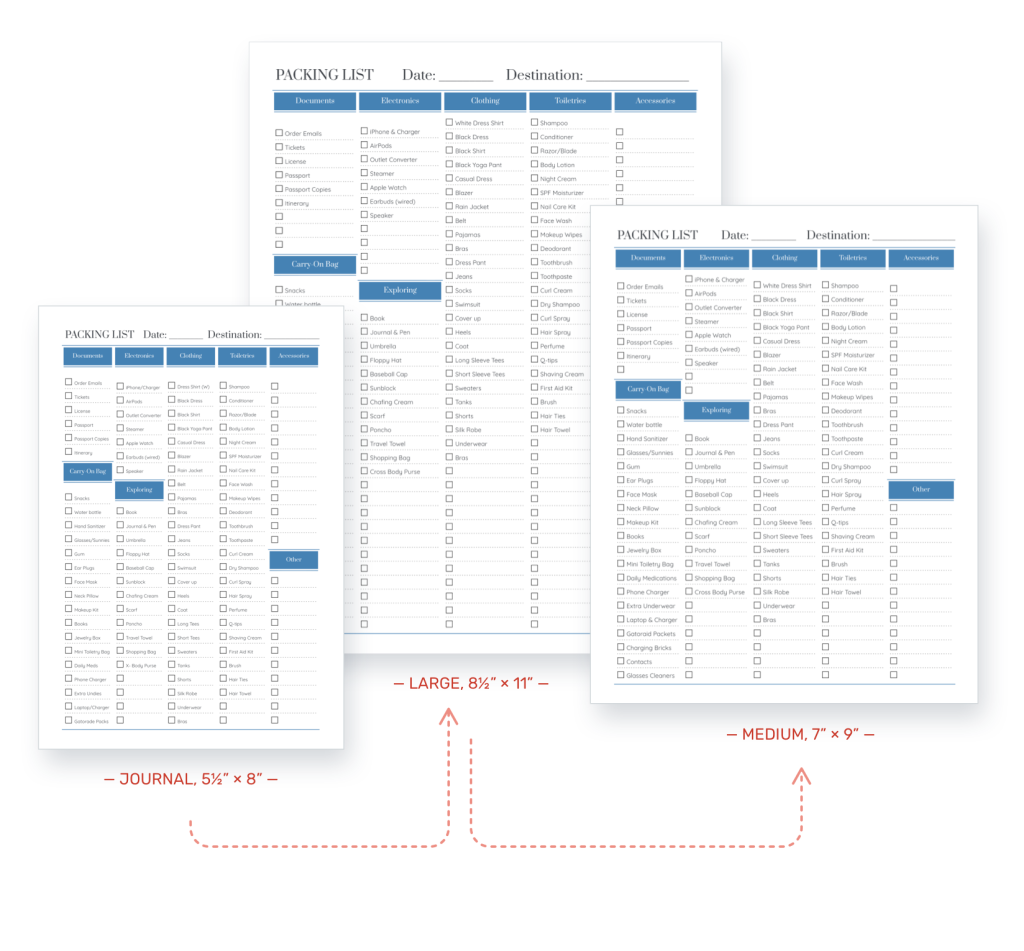
Resize is now 100% complete. You can now resize any Agendio Pro pages you have previously made.
This means that if you previously purchased a Pro agendio and want to change it to a bigger or smaller size, you can now resize all your pages quickly and automatically.
So, you can now convert your medium daily layout or a journal-sized meal plan into a large, or convert your large-size budget page or weekly layout or flex-table into a medium or journal-size.
But what’s also exciting is that now, if you like a shared page in the Agendio community sharing library, but it’s the wrong size, you can still take it and then, from your MyStuff page, simply adjust its size to the one you want. And since our sharing library is growing every week, you’ll soon have a very big selection of ready-made pages just waiting for you.
Resizing a page is straightforward:
Go to My stuff, to Pages
Find the dated page you wish to enlarge
Roll over “Options”
Select “Resize”
Select the target size and update the suggested name if desired
The newly created page will automatically be created and shown to you in the Designer for review.
PLEASE NOTE
If you use this feature, please verify the resized page carefully. The resized page will have been created by an automated process, and it might make a mistake. So it’s important to review each resized page.
Agendio Builder previews now show your entire agendio and include every month, week and day and all Extra pages.
Agendio Builder previews have traditionally left out many months in the middle of agendios, if only to reduce page load times. But we extended the previews for Pro planners a short while ago to show the entire book and this week we also added the feature to Classic planners.
So now when you are on the review page, you can review your planner in its entirety before purchasing.
Try the feature now and let us know what you think.