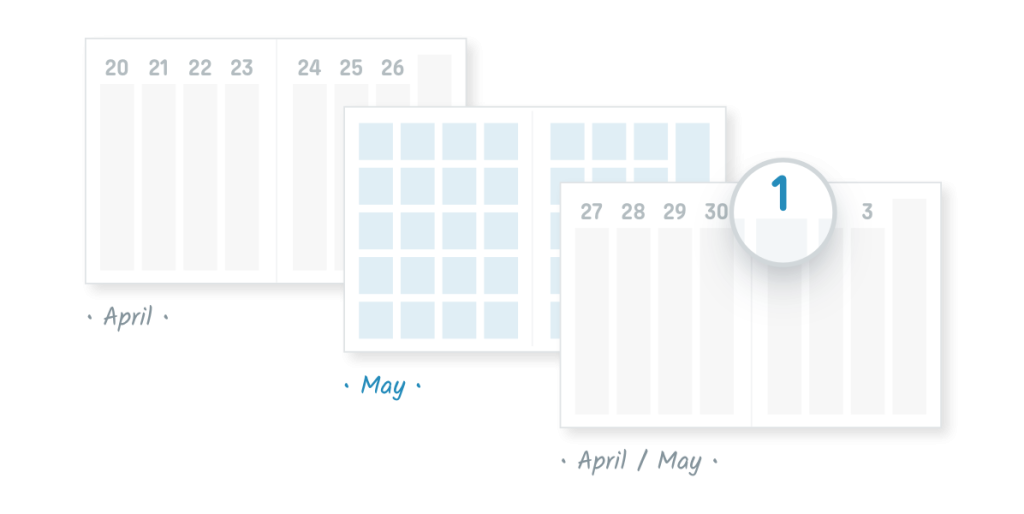
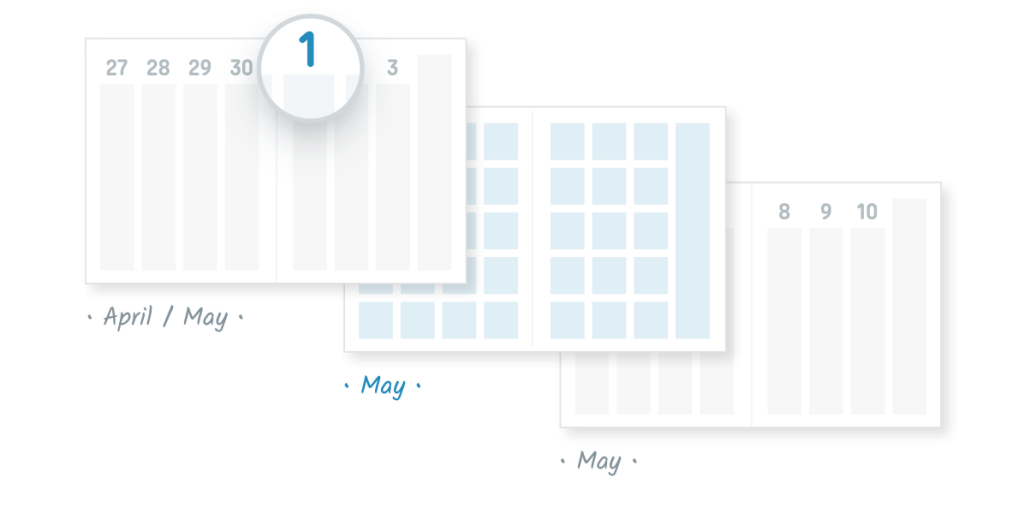
Category: Configurations Page 1 of 2

MONTHLY PLACEMENTS

We have big news for you if you use a Pro monthly-weekly or monthly-daily agendio or if you plan to create one!

When your planner includes both monthly pages and another frequency, and your monthly pages are mixed with your other dated pages, there are many approaches for placing the monthly pages. Until recently, we always placed monthlies before any weekly pages that feature days from the next month.

Let’s use an example from 2026, using the week that runs from Monday April 27 to Sunday May 3.

Currently, we place the monthly before any weekly pages that feature days from May. So we would typically place the May monthly before the weekly spread of April 27 to May 3. We call that placement BEFORE.

This is the default placement for agendios. If you do not select a different placement, this is the one we will use for your agendio.

The big news is that we have added two other options for you to place your monthly pages.

The first one is called AFTER. As you can figure out, if you select it, we place your monthly pages after any weekly pages that feature days from the next month. So in our example, we would place the May monthly after the spread of April 27 to May 3.

The other new option is called BEST FIT: It’s a great feature because it automatically selects for you “Before” or “After”, depending on which one works better. If the week layout includes more days from the following month, it places the monthly before that weekly layout. But if the week layout includes more days from the preceding month, it places the monthly after the weekly pages. You can find out more details in the guide, but the best way to understand “Best fit” is to try it out in the Pro Builder, by building a planner with a monthly and another type of dated pages, selecting “Best fit” and then looking at the preview.

BIG WEBSITE UPDATE

We have some very exciting news to share: We recently made some big changes to our website:

We updated our home page to show your options more clearly.

We added more information about our pages,

and we replaced the Pages & more section with our newly-created Agendio Hub. 

The Agendio Hub is a central location in which we have combined in one place every agendio you have made and everything you need to make more Pro and Classic agendios. It includes:

  1. CREATE: The starting point to create all new Pro and Classic planners, inserts and notebooks.
  2. REPRINT: The starting point for reprinting
  3. PRO LIBRARIES: The place to see the Pro page libraries (templates and shared)
  4. MY STUFF: The central location for all your saved and purchased agendios, both Pro and Classic. 

You can now go to one place to see all your Agendio products, access them easily to edit or reprint them and start new pages and agendios.

You can access the Create page and My stuff from assorted pages on the website or directly from the website navigation.

We’ve also added more videos, showing you how to create agendios with both Classic and Pro. We plan to add more throughout the year.

Do you like the update? We’d love to hear from you what you think of the changes.

2025 AGENDIOS

It’s now July. 2024 is already half gone (!) and planner fans are starting to think about planners for 2025.

You can now order your agendio with start dates up to July 2025.

If you like to order two agendios for each year in advance, one starting in January and the other in July, you can now order them.

Don’t forget about our “Future month” pages – Our Extra pages that look like row monthlies. They can be very useful if your agendio runs only for part of a year.

Add some after your dated pages to have a place to list appointments and todos right after your planner ends, and then copy over those tasks when you start your next planner.

AGENDIO NOTEBOOKS

We see so many great ideas in the agendios we produce that we’d like to share some with you this fall.

At this time of the year, most customers are focused on our fully customizable planners and inserts. But many customers order notebooks, and some customers order both.

So today we’re featuring a great Notebook focused on gardening. Our customer Beth created a variety of useful pages, including some for seeding, tracking each crop and even for designing her next garden layout.

Whether you run a farm or you’re a hobby gardener, or if you’ll be using your notebook for something else, you’ll be putting your notebook to use sooner than you think. And if you are a hobby gardener, what better time to think about planting and harvesting food than Thanksgiving?

Which hobbies or interests in your life would be easier to manage with a custom agendio notebook?

DOUBLE WEEKLIES

Over the years we’ve been asked about double weekly planners – Planners that include two dated spreads for each week. We don’t offer them, but we’d like to share with you examples of double weeklies that customers have been making on their own. Agendios are so customizable that you can not only personalize the content of pages, but also create fundamentally different planners, and what wonderfully creative planners we are seeing.

Why would you want a double weekly? The big benefit is that you create much more space per day than a weekly, without switching to a daily format. Some customers are currently creating one spread for work and the other for home, or one as a regular dated weekly spread and the second as a place to add more detail to each day.

For example, here is a row weekly layout with a secondary weekly created out of divisible pages to add a schedule for each day. The primary row weekly planner pages can’t be used easily for scheduling an entire day, but the secondary pages can.

double-weeklies-A

If you want to make a double weekly, select a configuration that includes at least one spread after each week. We show this as WWEE, the W’s being weekly pages and Es being Extra pages. Then in the Builder, on the Extra pages screen, near the top/right, you highlight your extra pages and customize them to include features that usually come with dated pages. The best pages to use as a base for this are divisibles, either one or two column, or Flex pages.

Here’s an example that includes four Extra pages (we’re showing only two). The primary weekly is made up mostly of a schedule for each day and the Secondary pages add space for todo lists and notes.

double-weeklies-C

And here’s one that adds pages to track billable time by day. Similar to the first example, the primary is a row planner, and the secondary pages are used for schedule-related tracking.

double-weeklies-B

If you’re thinking of making a double weekly, just remember that you need to start with the correct configuration, which includes a weekly followed by two Extra pages. If you forget, or if you want to convert an existing weekly into a double weekly, it’s easy to do: Go to the Builder Info page and at the top you will see a button to change your configuration.


THICKER PAPER

We now offer a thicker version of our highest quality, optimally smooth white paper.

Please note that it’s available only with a custom configuration. To use it in your next agendio, go to the Custom configuration screen, which is now the default configuration screen, and select the 120 gsm paper option.

32lb-paper

You can find out more details about our paper in our Features section, at https://agendio.com/features/#paper


END-OF-MONTHLY-SEQUENCE EXTRA PAGES

We now offer “End of monthly sequence” Extra pages.

If you select this option, we will place your end-of-monthly-sequence Extra pages (or EOM pages) after all the other pages for each month.

For example, if you select a “MMWW” (or monthly-weekly), and you add EOM pages, we will place your pages as follows: The first monthly, followed by all of that month’s weeklies, then your EOM Extra pages, then your next monthly, your next bunch of weeklies, your next EOM pages, and so on…

It will look like this:

1. mmww_tt-mini-gs

And the configuration will look like this:

2. mmww_tt


Notice that the end-of-sequence icons show a small right-facing arrow below the E, to show that they are not standard Extra pages.


You don’t have to include monthly pages in your configuration to use EOM Extra pages.

For instance, you might have a Weekly-only configuration, WW, but you would now like four pages at the end of each monthly sequence. Perhaps you’d like some note or summary pages but you don’t need them every week. You would create this sequence on the custom configuration page by choosing WW for your weeklies, then one set of EOM Extra pages, then another. Your final configuration would look like this:

3. ww_tttt

And would create the following sequence of pages:

4. ww_tttt-mini-gs


You can also mix standard and EOM pages in one configuration. You could select monthly pages, followed by standard Extra pages, then weeklies and then EOM pages. The resulting configuration would be:

5. mmnnww_tt

and would create the following sequence of pages:

6. mmnnww_tt-mini-gs


Please note that you can select EOM pages only on the Custom configuration selection page.


If you add EOM pages, and you’re not sure if your configuration was created correctly, you can look at the preview on the Builder review page. That’s actually something you should always do before ordering, to catch any errors in customizations you may not have noticed.


2 PAGE PER DAY DAILIES ARE NOW AVAILABLE

two-pages-per-day

CHANGE YOUR CONFIGURATION (Without Starting Over)

One of the shortcomings of our system has been that if you want to change your configuration after having customized some or all of your planner, you must start over.

We’ve now eliminated that issue – We have now added an option in the Builder that allows you to update your configuration without losing your customizations. You can find it on the first (Info) page.

change-config

So now, if you’ve already spent two hours in the Builder and you decide that you want to add a monthly to your configuration, or you want to change those weekly Extra pages to Monthly, and you don’t want to lose your work, just go to the info page, click “Change”, update your configuration and then return to the Builder to continue personalizing your agendio.


CUSTOM CONFIGURATIONS!

We just added a big new feature this week that we’ve been working on for many months, custom configurations. You can now create your own combination of monthly, weekly, daily and Extra pages.

Although we offer two dozen preset configurations, there are many other possible combinations, so this feature allows you the freedom to assemble a configuration of your choice if it isn’t available in our preset list. As well, it allows us to add more configuration options either later this year and/or next year.

custom-config

As part of this update, we also added two new options. You can now:

  • Choose from a wider selection of durations, from 3 to 12 months.
  • Choose the thickness of your paper, either 24/60 lb./90gsm or 28/70 lb./105 gsm. Previously, if you purchased a daily, the paper was automatically selected to be our thinner paper, to fit in our binding. However if you choose a shorter-duration planner, you can now choose our thicker paper, even for your daily.

paper-and-months-selection

So now, with these new features, you can make a variety of highly-personalized planners, such as:

A 4-month student planner with labels for your courses for one term;
A short-term planner to get you to a key date, such as your birthday, to start your next planner and track your year.
A special 5-month project planner, with a large assortment of tracking Extra pages each week to help track all aspects of your project;

Using the custom configuration option is easy, but in case you’re not sure how to go about it, we’ve added a short video on the new configuration page, showing four examples of how to create a custom configuration.

show-me-how

Please be aware that the Personal-year planner option has been discontinued – It added complexity to the process of selecting a planner without adding enough benefits. Instead, we added all the features available previously in Personal-year planners, such as planning pages and the ability to start your planner on any day of the month, to our standard planners. So you get all the features, but with a more streamlined process.

As a result of this change, the red “N” icon for note pages and the yellow “P” icon for Planning pages have been combined into one icon, an orange “E” icon for Extra pages.

If you want to check out our custom configurations, just do as you’ve always done: Select either planners or inserts and the next page will be the configuration page.

And, more good news!: We will add new spiral-bound cover designs by mid-October! We know that many of you have been asking for new designs this year, so we‘ve been working on making that happen. We hope you’ll like them.

As always, let us know if you have any questions,

Page 1 of 2

Powered by WordPress & Theme by Anders Norén