Do you like to customize and purchase your agendios well in advance of the start date? If so, this is for you: We have added January 2022 as a start date.
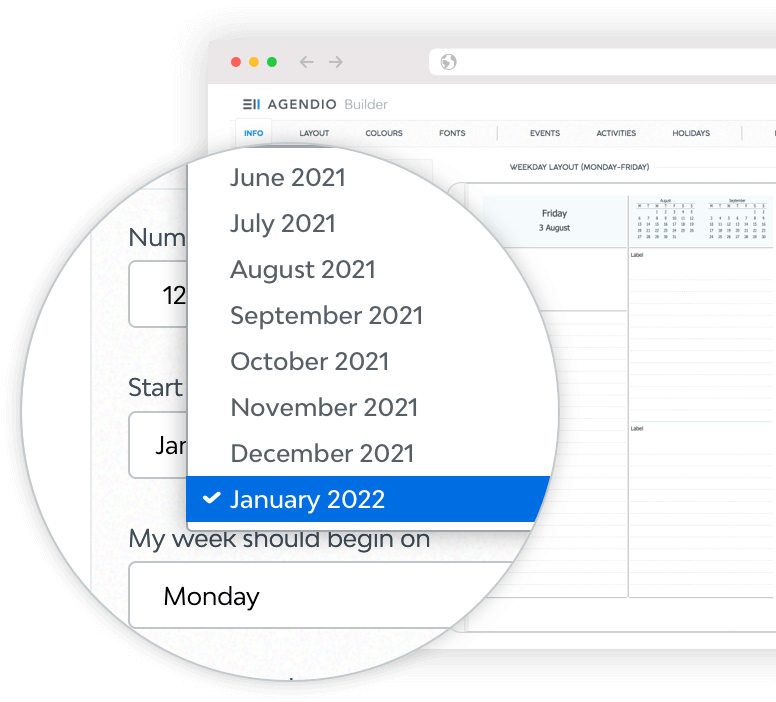
In July we plan to add the other months of 2022 (and we’ll remove January to June 2021).

Do you like to customize and purchase your agendios well in advance of the start date? If so, this is for you: We have added January 2022 as a start date.
In July we plan to add the other months of 2022 (and we’ll remove January to June 2021).
We now offer “End of monthly sequence” Extra pages.
If you select this option, we will place your end-of-monthly-sequence Extra pages (or EOM pages) after all the other pages for each month.
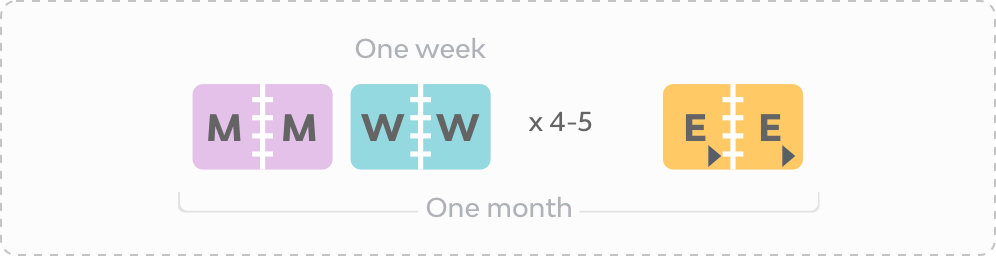
For example, if you select a “MMWW” (or monthly-weekly), and you add EOM pages, we will place your pages as follows: The first monthly, followed by all of that month’s weeklies, then your EOM Extra pages, then your next monthly, your next bunch of weeklies, your next EOM pages, and so on…
It will look like this:

And the configuration will look like this:
Notice that the end-of-sequence icons show a small right-facing arrow below the E, to show that they are not standard Extra pages.
You don’t have to include monthly pages in your configuration to use EOM Extra pages.
For instance, you might have a Weekly-only configuration, WW, but you would now like four pages at the end of each monthly sequence. Perhaps you’d like some note or summary pages but you don’t need them every week. You would create this sequence on the custom configuration page by choosing WW for your weeklies, then one set of EOM Extra pages, then another. Your final configuration would look like this:
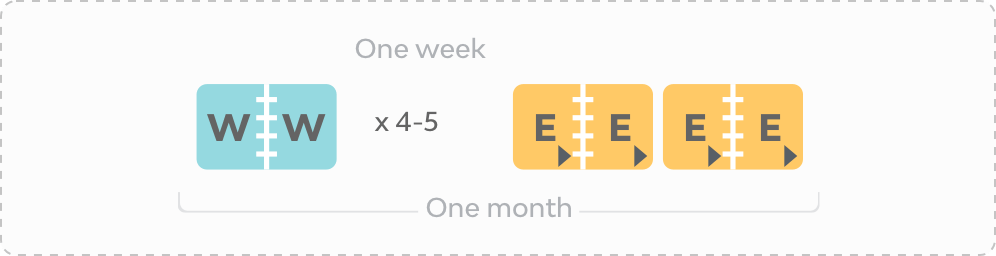
And would create the following sequence of pages:

You can also mix standard and EOM pages in one configuration. You could select monthly pages, followed by standard Extra pages, then weeklies and then EOM pages. The resulting configuration would be:

and would create the following sequence of pages:

Please note that you can select EOM pages only on the Custom configuration selection page.
If you add EOM pages, and you’re not sure if your configuration was created correctly, you can look at the preview on the Builder review page. That’s actually something you should always do before ordering, to catch any errors in customizations you may not have noticed.
Do you keep many loose sheets of paper in your agendio? Do you glue stickers in your planner?
If so, you may prefer having your agendio bound with a slightly (+1/16”) bigger diameter spiral. It will add a little more space so your pages don’t end up being squeezed in the binding.

Please note that spiral binding upsizing is not available with wrap covers.
You can now add page numbers to your agendio, at the bottom of each page, centered.

We’re close to releasing some new features we’ve been working on this year. Since many of you are now customizing your planners for next year, we decided to tell you now, in case you were interested in these features. They should start being rolled out in a week or two:

End-of month Extra pages are Extra pages that are placed at the end of each monthly page sequence, whether or not you include monthly pages in your agendio
Spiral upsizing is the option to get your spiral-bound agendio with a spiral one size bigger than usual.
Like most everyone else, our 2020 has not proceeded as we originally planned. Covid-related physical distancing and other restrictions we faced while manufacturing your agendios has reduced our productivity, and we haven’t been able to release as many new features as we had planned at the beginning of the year. The delayed features, including larger fonts for activities and events, should be added by summer 2021.
They have only 3 columns to a page, so there’s more room to write on each line. If you’re looking for the widest weekly columns possible, you should check them out.

You can see them on the weekly model pages. They will be at or near the top of your list, just below any models that are in your library (which are always first).
We’ve added a new side-by-side label pagelet option on a few of the new models, where you can choose between fewer wider pagelets or more narrower ones. It’s a bit like a horizontal divisible. Let us know if you like the idea!
And as always, let us know if you have any questions.
We’re working on some new layouts. We thought you might like to know, in case you’re customizing your next agendio.
We’re designing a number of “3-column” layouts, meaning they have only 3 columns to a page, so there’s more room to write on each line. They’re for everyone who is looking for the widest weekly columns possible.
Here’s a sneak peek at one of the designs. We hope you like it.
The majority of the work is done, but there’s still testing to do, so the new layouts should be live sometime in June.
The plastic covers that we include with our spiral-bound planners are now 50% thicker than they were previously.
During 2019, a small number of customers reported that their plastic covers had issues or had failed. Although only a very small number of customers were affected, and the cause of the issues may not even have been related to the plastic, we nonetheless decided to look into providing a more resistant plastic for all customers. Our conclusion was to make them thicker, which we did in late 2019. So now they’re the thickest of any plastic planner covers available.

We’re confident that our new plastic covers will be even more resistant and durable, so let us know if you have any issues with yours.
Powered by WordPress & Theme by Anders Norén

